Thursday, December 10, 2009

"Do you have your exit Buddy?"

First and foremost I wanted to welcome my new follower Debbie. She has several blogs but I will give the link to her first one. This one is fun to read. Go check it out!

http://debbiestinytreasures.blogspot.com/

Thank you Debbie for joining!


Bunka Rugs


I guess it took me a while longer than the weekend to get these done. I did get the photos taken on Saturday, but then I got terribly sick & today is the first day I have felt like even getting on the computer. I realize now that the photos aren't that great, but you can get the idea. This is my bunka rug of one of my (many) favorite Disney characters "Squirt". The first photo is blurry, but the colors are accurate, the second photo, the colors are horrible, but it is more in focus. This was just one of those pictures that I could not get right no matter how I tried. So I gave up & posted 2.

Below is the bunka rug my daughter made of one of her favorite characters. (we are Disney freaks in our house) In all fairness her colors are not quite right because when I ordered the bunka, I did not know she wanted colors for stitch, so she just worked with what we had on hand. but over all, it turned out pretty good.


This is my little kit I found of a dollhouse for a dollhouse. It is all put together and painted, but I still have some landscaping to do. I had forgotten how fun these little kits were to do. I used to have several of them but the cat ate them, & I gave up which is probably why I found this one at the bottom of a box of mini stuff that had been in storage for years.


That is all I have really done with minis recently. Time just seems to slip by at an amazing speed at the moment. I have also received all 3 of my Etsy purchases for the gift exchange at our mini club, but I cannot post those yet. Our party will be on the 15 of this month, so some time after then I will get them posted along with what we received! Ohh I just love giving gifts!
I cannot wait to see if they love their gifts!
Well, I have to get ready for bed now, have a great night~

Thursday, December 3, 2009

Time flies....

Wow! It has been over a month since I have been able to get on here. Whew, this is a crazy time of year for me! My computer died & had to go through the process of getting it all back in order. It was in the shop for over a week, which just about killed me. Then getting everything reconfigured to how I wanted it to be... well, took a while. Work, Kids, School, & Scouts pretty much took up the rest of my time.
I know this is a bit after the fact, but I do hope everyone had a great Thanksgiving. Mine was rather unconventional, but wonderful none the less. My husband took both children to see his family for 2 days, so I got to be in my own home ALL BY MYSELF! it was heaven. I can't remember the last time I was actually alone with no interruptions. Probably before the kids were born.
I got some time to work on minis so I did finish another bunka rug & started a 1:144 scale dollhouse kit. I did quite a bit of sorting & organizing (which is when I found the dollhouse for a dollhouse kit). I have yet to touch the garage again.. I am not in the mood to do the garage, but maybe over Christmas....Hopefully, I will get a chance to post some photo's this weekend of the rug & almost done house.

I am also very proud to say that I made my first ever Etsy purchases! I must say that I am NOT an internet shopper... I am more of an instant gratification type of person. I do not do well with waiting for things to arrive when the postman decides it is time for it to come! However I do have to say that it was much easier than I thought it would be & the people were just wonderful! I will post some photos & their info once I receive it & take some photos' but it will have to be after our Miniature clubs Christmas party. They do a gift exchange, so I had to get a gift from me, & then one from each of the kids. They had a lot of fun looking through Etsy trying to find the "perfect" thing. I found some new ones to bookmark as well. :)

Sunday, November 1, 2009

WELCOME!!!

I wanted to send out a warm welcome to my new followers:

Anneke - http://pieplyts.blogspot.com/

Kathi - http://beautifulminiblessings.blogspot.com/

Debie - http://piskies-and-poppets.blogspot.com/

Lori - http://ohminiofmine-loshcosh.blogspot.com/

Cate & David - http://soletluna.blogspot.com/

Nikki - http://nikkinikkinikki72.blogspot.com/


If they are new to you, check out their blogs! This is a real creative bunch!

Saturday, October 31, 2009

Happy Halloween

We have finally finished trick-or-treating the kids are working on their candy coma right now... oh to be a kid again! Here is a pic of my munchkins hat....


This is her cool witch hat! I LOVE, LOVE, LOVE this hat!


Tuesday, October 27, 2009

Well, I was really sad to see that I have not posted in a while, which really means I have not had time to do any miniatures lately. I just knew that when I did that last post, I would have the wiring done that weekend! But the reality is I have not even gotten to the store to buy the wiring tape, much less read about how to do it again. My current goal is to try again this weekend to see if I can get anything accomplished.
At times When I am reading through my favorite blogs, I really envy the time others seem to get to devote to their craft- getting to learn new skills & do the things their creativity leads them to. All of my ideas just seem to endlessly swim around my head with no way to try it out. Then I wallow for a few hours, put my big girl panties on, leave my own pity party & get back to my life.
So to pacify myself -I decided to post some photos of the very first kit that I ever did. It is a old type of toy store. Very basic... but still was a lot of fun.


This is the front


Looking through the bay window.

These bricks were really fun to do, I was so pleased with the way they turned out. I used the sticker kit & it was wonderful! So easy!
Same with the front sidewalk

Inside- photo is a little blurry, but it shows the lighting really well.


looking through the door


this is the birds-eye view. I did the wood flooring in there as well.

I hopefully will get some fun things done this weekend, I really want to make some blackberries that I found in a tutorial, also, I want to play with making molds for some of my breads. I have also been collecting some logos for the Chudley Cannons to put in Ron Weasly's bedroom.


Sunday, October 11, 2009

About ready to tackle the garage

Well, I have been pretty busy with real life as usual, and have been sorting through all of my old stuff from storage trying to find places for it all. When I started this blog, I said that I had come across a few unfinished projects in all of my miniature stuff. One of the things I found was this partially finished garage that I had started as a State Day project back in 1994 (I think). Now, when I found all of this stuff I promised myself that I would finish up all of my old projects before starting any new ones, so I am about ready to start finishing the garage. Being that it was so long ago, I really have forgotten my original vision for this garage, so now in looking at it I want to add electricity to it so you can see the inside well, my main problem is that I have already put the wood siding on so I can't run the wiring on the outside and on the inside I have already glued in a floor (sandpaper pained grey) and painted the walls, so do I rip all of that up, or just work around what I had previously done?


the garage with no roof


slanted view


Front view


The way the roof was designed (not my patten), it slips inside the top, so the only place I can really put the lighting is on the side walls or on the inside of the front wall, almost directly over the front doors.
My other dilemma is how to finish the outside, weather to make it new or old looking & then to do natural wood looking or painted.

If you two (who might actually read my blog :) ) have any suggestions, please let me know.. I am at a loss at this point.

Tuesday, September 29, 2009

Mosaics

At the request of my newest and second follower, I am posting some photos of some of the mosaics I have done in the past.
Enjoy......


This is a bird bath that I made for my mother. It is made out of a large terra-cotta pot.


This is the top of the bird bath.


This is a set of 3 trivets that I made. They were done on a wooden base and then I put felt on the bottom.


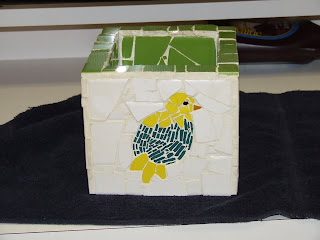
This a wooden box that I found. Each side has a different picture & the inside is solid lime green.


Side 2


Side 3


Side 4


This is a mirror frame that I did for one of my son's teachers ( I loved her!) And no! It is not a Christmas mirror, although it really does look like one. :)

Close up of mirror corner before it was grouted

This is a mosaic tile baseball I did for one of my old bosses. This was the result of my husband telling me I could not do something! I was walking around the local craft store one day looking for inspiration & different surfaces that I could tile, when I came across these wooden spheres, Then he looked at me like I was an idiot... "you can't tile a ball!" He said to me, so I promptly put 5 of them in my buggy and headed home. It was actually pretty easy, and a lot of fun, so now you know... you CAN tile a ball if you are so inclined! ;)

Another photo of the baseball
Now you need to go & see some REAL mosaic tiling and look at the window she just completed! It is beautiful!

Sunday, September 27, 2009

My first rug

The kids and I went to our monthly miniature meeting and we learned how to make rugs out of "bunka" cord. I like these rugs because it has the look and the feel of an embroidered rug without having to do embroidery! We did not have time to finish during the meeting, but I finally got around to finishing mine. This project was fairly simple and fun to do, so now that I know how to do it, I think this would be a great way to make customized rugs for the Weasleys house. I already found a pattern for Ron's room with the Chudley Cannons! Now I just need to order the colors I need online.


Thursday, September 24, 2009

My unexpected bargin!

Well, I have been really busy in the real world recently, so I haven't had much time for creating, but I did want to take a second to share my unexpected bargain that I found this past week. I was browsing through Craig's list one night for used camping equipment for my Girl Scouts to get, and I decided, just on a whim, to do a search on dollhouses. Well, most of them were for the plastic/pink/Barbie houses, but there was one listing for a wooden dollhouse and a box of furniture for $80.00. $80.00!!! I HAD to go & check that out, so I called the lady first thing in the morning and it happens that she lives about 30 miles away. Not too bad of a drive, so we made plans to meet around noon right off of the interstate. Now the photo's that she put online mad it look like a fairly small house. Maybe like a 2 room house with a small attic. It was cute, but it looked small. I was really more interested in the box full of furniture. She told me over the phone that it was all wooden and her grandfather had made it all. Well worth the drive to investigate. Well, I get there and the house is HUGE! it will not fit in the back seat of my car no matter how we tried to fit it in there. So we ended up barely fitting the base of the house in the trunk & tying it down with bungee chords. I got it home safely, but now have no where to put the dang thing!!! It is about 3 1/2 feet wide & 2 1/2 feet tall and about 2 feet deep.


This is the front of the house, the front door needs to be fixed, but she did have it in the box.
This is the inside of the house. On the first & second floors, the rooms go all the way through from front to back, but on the third floor- the larger room on the left goes all the way through, but the smaller room has a wall splitting that section into 2 smaller rooms.
This is the roof side access to the small room on the third floor.
Inside the roof side room, the door needs repair, but it does lead to the balcony on the front of the house.
The stairs on the second floor need to be repaired, they keep falling out.
Now for the furniture......


These are all of the dressers and nightstands that came in the box. All of the drawers and doors open.
These are all of the chairs and tables that came in the box. The two tables with the white tops are actually marble top tables.
There were 3 beds in the box. All of the beds came with foam for mattresses, & 2 of them had hand made crochet coverlets.
Here are the remaining items. A wall shelf, a corner shelf, a grandfather clock (the door opens and the weights are in there as well) and an oven for the kitchen that opens and the shelf comes out.
There are a few more misc. pieces that were in the box, but they had legs that were broken. All of the broken pieces look to be simple repairs so over all I am very excited about my find!

Thursday, September 10, 2009

Well, I have finally gotten a chance to take photos of some of my creations. The photos are not that good, but it should give you the general idea. I desperately need to learn how to take photos of my miniatures with my regular digital camera. Hopefully it will get better as I go along!


These are some little caramel creame candies, it looked simple enough to try. I think I need to get a littel more "creame" in the middle, but otherwise I am happy with them.


This is my bowl of potato salad. My favorite part is the egg slices.


This is potato salad with bell pepper topping.


I had so much fun doing these! When I started searching online for the "how to" for fimo & sculpey clay, this is the result of the first tutorial that I found. The tutorial was great & easy to follow, so my bread came out pretty good for someone who has never played with clay before. They may not be quite to scale, but they are not too huge. here is the link for that tutorial in case you would like to try...


a close up of my french bread. So cute!!
Well, That is all of the photos I have for now. The kids started school about 3 weeks ago, so we are adjusting to the newer/stricter schedule of the school year. I haven't had much time to play with all of my mini's. When I found all of my stuff in storage, there was a toy store that I had done 14 years ago, so I have been restoring things on that building. I also came across 2 other scenes that were half finished. I will try to photograph those when I get a chance and get them posted. One of them is a little window scene, and the other is a garage. The window scene is done, & the garage is only built, not decorated at all. So I figured before I start anything new, I need to get those other projects done first.

Sunday, August 23, 2009

Well, I guess this is my first post to this blog. I will start with a little background. I started doing miniatures in 1992. I have done a victorian/old time toy store and several different roombox scenes that were gifts for friends. In 1996 I had my first child and shortly after packed up all of my miniature stuff to be put in storage. (all of those little choking hazards, not to mention the damage that little hands could do to my miniatures).

Now fast forward to 2009, my first child is now 12, my second child is 10. Now all of this time my stuff has been in storage at my mother house, well, she is retiring & moving so I am forced to clear out all of my storage stuff and figue out where it will go. I came across my boxes of miniature stuff which my children were really facinated with. So... after some thinking and talking with them, we decided that miniatures will be a fun craft that we can do together. So I did some calling around, and the miniature club I had belonged to in 1993-1996 was still meeting, so we decided to go. The club will normally do a "make-it take -it" project, and this meeting we learned how to make potato salad and potato chips. Well, the kids were hooked! They were so excited and proud of what they had done, they could not wait to go back.

Now we are planning on doing minature picnic scenes to display our newly made treasures in. Of course we will have 3 picnic scenes, because you simply can't have 3 bowls of potato salad at the same picnic. :)

I have been doing a lot of playing with fimo & sculpey trying to come up with some more food for our picnics. So far I have learned how to do miniature bread, fried eggs, bacon, and caramel creams. O.K., so fried eggs, bacon & caramels are not normal picnic foods, but I saw them & HAD to try it! They are so cute! I will get some pictures posted as soon as I figure out how do miniature photography on my digital camera.